0%

display

每个元素都有一个默认的 display 类型
不过你可以随时随地的重写它!如常见的例子是:把 li 元素修改成 inline,制作成水平菜单。

p标签是块级元素,span元素是行内元素。内元素可以写在块级元素里面 比如<p><span>内容</span></p>

  • block

值为block的为块级元素, 如:p、form、header、footer、section

  • inline

值为inline的为行内元素

position

  • static

static是默认值,一个static元素表示它不会被”positioned”,一个position属性被设置为其它值得元素表示它会被”positioned”

  • relative

relative,在一个相对定位(position属性的值为relative)的元素上设置 top 、 right 、 bottom 和 left 属性会使其偏离其正常位置。
其他的元素的位置则不会受该元素的影响发生位置改变来弥补它偏离后剩下的空隙。

  • fixed

fixed,一个固定定位(position属性的值为fixed)元素会相对于视窗来定位,这意味着即便页面滚动,它还是会停留在相同的位置。
和 relative 一样, top 、 right 、 bottom 和 left 属性都可用。

  • absolute

absolute, 它与 fixed 的表现类似,但是它不是相对于视窗而是相对于最近的“positioned”祖先元素。
如果绝对定位(position属性的值为absolute)的元素没有“positioned”祖先元素,那么它是相对于文档的 body 元素,并且它会随着页面滚动而移动。
记住一个“positioned”元素是指 position 值不是 static 的元素。

mbp

  • margin

    是设置两个标签的间隔,也就是距离

  • padding

    比如一个p标签,它是100px*100px,我们使用的时候p标签的文字是贴着p标签的最左侧的,想要它的文字距离边界远一点,好看一点,就是需要做一个样式的调整,我们可以用到padding这个属性,假如说设置是10px,就是说这个p标签的大小依然是100px*100px,但是它的内容是变成了90px*90px;

  • border

    boarder是设置边框的意思,他和padding的区别在于,padding是在标签边缘往里缩减,而border是在标签的边缘往外扩展,也就是说是一个100px*100px的标签,我设置他的border为20px,我们就可以看到整个标签的大小是变成了120px*120px,也就是说多出来了120px,其标签的内容也还是100px*100px的

https://blog.csdn.net/LOVELONG8808/article/details/52235132

https://blog.csdn.net/w1992wishes/article/details/79583543


WebSocket API是下一代客户端-服务器的异步通信方法。
WebSocket API最伟大之处在于服务器和客户端可以在给定的时间范围内的任意时刻,相互推送信息。
WebSocket并不限于以Ajax(或XHR)方式通信,因为Ajax技术需要客户端发起请求,而WebSocket服务器和客户端可以彼此相互推送信息;
​ XHR受到域的限制,而WebSocket允许跨域通信。
​ Ajax技术很聪明的一点是没有设计要使用的方式。WebSocket为指定目标创建,用于双向推送消息。


activemq是消息中间件,主要实现是队列。用于处理消息。
websocket是 html5的一种传议实现前台向后台,后台向前台发出请求。


websocket是HTML5协议,实时,全双工通信,长连接。WebSocket的服务端可以将数据推送到客户端,
​ 如实时将证券信息反馈到客户端,实时天气数据,比http请求响应模式更灵活,代替了以往一些需要轮训的业务。

STOMP协议的前身是TTMP协议(一个简单的基于文本的协议),专为消息中间件设计。

这两个协议的介绍来看设计的目的不同。目前一些消息队列都是基于STOMP协议的比如ActiveMQ,RabbitMQ,消息队列一般用于一些需要异步处理的服务器任务或者一些通知类的任务。

websocket更多的使用场景是需要服务端主动通知客户端的实时通讯业务。

知识点

  • the size of blob column

    1
    2
    3
    4
      A BLOB can be 65535 bytes (64 KB) maximum.
    If you need more consider using:
    a MEDIUMBLOB for 16777215 bytes (16 MB)
    a LONGBLOB for 4294967295 bytes (4 GB).
  • join sql

  • string convert to timstamp

    SELECT STR_TO_DATE('2014-05-28 11:30:10','%Y-%m-%d %H:%i:%s');

sql语句

  • IN

确定给定的值是否与子查询或列表中的值相匹配。in在查询的时候,首先查询子查询的表,然后将内表和外表做一个笛卡尔积,然后按照条件进行筛选。所以相对内表比较小的时候,in的速度较快。

1
2
3
4
5
6
7
8
9
10
11
SELECT
*
FROM
`user`
WHERE
`user`.id IN (
SELECT
`order`.user_id
FROM
`order`
)

以上查询使用了in语句,in()只执行一次,它查出B表中的所有id字段并缓存起来.之后,检查A表的id是否与B表中的id相等,如果相等则将A表的记录加入结果集中,直到遍历完A表的所有记录。

可以看出,当B表数据较大时不适合使用in(),因为它会B表数据全部遍历一次. 如:A表有10000条记录,B表有1000000条记录,那么最多有可能遍历10000*1000000次,效率很差. 再如:A表有10000条记录,B表有100条记录,那么最多有可能遍历10000*100次,遍历次数大大减少,效率大大提升。

  • exists

指定一个子查询,检测行的存在。遍历循环外表,然后看外表中的记录有没有和内表的数据一样的。匹配上就将结果放入结果集中。

1
select a.* from A a where exists(select 1 from B b where a.id=b.id)

以上查询使用了exists语句,exists()会执行A.length次,它并不缓存exists()结果集,因为exists()结果集的内容并不重要,重要的是结果集中是否有记录,如果有则返回true,没有则返回false。

当B表比A表数据大时适合使用exists(),因为它没有那么遍历操作,只需要再执行一次查询就行. 如:A表有10000条记录,B表有1000000条记录,那么exists()会执行10000次去判断A表中的id是否与B表中的id相等. 如:A表有10000条记录,B表有100000000条记录,那么exists()还是执行10000次,因为它只执行A.length次,可见B表数据越多,越适合exists()发挥效果. 再如:A表有10000条记录,B表有100条记录,那么exists()还是执行10000次,还不如使用in()遍历10000*100次,因为in()是在内存里遍历比较,而exists()需要查询数据库,我们都知道查询数据库所消耗的性能更高,而内存比较很快.

  • where

sql查询条件中where 1=1,1=2和1=0,这种写法,主要是为了拼凑动态的sql语句,如果使用不好会起到副作用的,是根据个人的一些习惯,是为了避免where 关键字后面的第一个词直接就是 “and”而导致语法错误,是为了后面附加and …方便程序逻辑处理用的。

  • select count(*)和select count(1)的区别
    1
    一般情况下,Select Count(*)和Select Count(1)两着返回结果是一样的,假如表没有主键(Primary key), 那么count(1)比count(*)快,如果有主键的话,那主键作为count的条件时候count(主键)最快,如果你的表只有一个字段的话那count(*)就是最快的。

事物隔离级别

  • read uncommitted(读取未提交数据)

    我们将事务隔离级别设置为read uncommitted,即便是事务没有commit,但是我们仍然能读到未提交的数据,这是所有隔离级别中最低的一种。

    脏读

  • read committed(可以读取其他事务提交的数据)

    大多数数据库默认的隔离级别;

    当我们将当前会话的隔离级别设置为read committed的时候,当前会话只能读取到其他事务提交的数据,未提交的数据读不到。

  • repeatable read(可重读)

    MySQL默认的隔离级别

    当我们将当前会话的隔离级别设置为repeatable read的时候,当前会话可以重复读,就是每次读取的结果集都相同,而不管其他事务有没有提交。

    幻读

  • serializable(串行化)

    当我们将当前会话的隔离级别设置为serializable的时候,其他会话对该表的写操作将被挂起。可以看到,这是隔离级别中最严格的,但是这样做势必对性能造成影响。所以在实际的选用上,我们要根据当前具体的情况选用合适的。

DDL VS DML

DML statements are SQL statements that manipulate data. DML stands for Data Manipulation Language. The SQL statements that are in the DML class are INSERT, UPDATE and DELETE. Some people also lump the SELECT statement in the DML classification.

Data Definition Languages (DDL) are used to define the database structure. Any CREATE, DROP and ALTER commands are examples of DDL SQL statements.

设置远程登录

  • mysql 8版本设置可用root远程访问服务

    1
    2
    3
    4
    5
    CREATE USER 'root'@'%' IDENTIFIED BY 'password';

    GRANT ALL PRIVILEGES ON *.* TO 'root'@'%' WITH GRANT OPTION;

    FLUSH PRIVILEGES;

mysqldump

  • 导出数据库

    1
    2
    mysqldump -h127.0.0.1 -P3306 -uroot -p database > file.sql
    其中 -h和-P可以省略(不过mysql在docker中不可以省略),database是数据库名称
  • 导出数据表数据(根据sql的where条件)

    1
    mysqldump -uroot -p database --tables tablename --where="id>8" > result.sql 
  • 执行sql文件

    1
    mysql> source /path/to/files/file.sql
  • 导出所有数据库

    1
    mysqldump -u root -p --all-databases > backup_filename.sql
  • 只导出建表语句

    1
    mysqldump -u your_username -p --no-data your_database > backup.sql

新增主键

suppose you don’t have column for auto increment like id, no, then you can add using following query:

1
ALTER TABLE table_name ADD id int NOT NULL AUTO_INCREMENT primary key FIRST

If you’ve column, then alter to auto increment using following query:

1
ALTER TABLE table_name MODIFY column_name datatype(length) AUTO_INCREMENT PRIMARY

Bash Scripting Tutorial for Beginners

Bash Shell Scripting Definition

  • Bash:Bourne-Again SHell
    Bash is a command language interpreter.

    conclusion

    Do not be afraid to break things as that is perfectly normal. Troubleshooting and fixing code is perhaps the best booster for you to enhance your understanding of bash scripting and to improve your ability.

Bash scripting Tutorial

session

  • kill seesion screen -X -S [session # you want to kill] quit
  • 新建screen会话 screen -S xxx
  • 恢复指定会话 screen -r xxx
  • 查看所有会话 screen -ls
  • 删除指定会话 screen -S xxx -X quit
  • 回到终端 Ctrl-a d

firewall

  • check status : sudo ufw status

  • enable firewall:

    1
    2
    3
    $ sudo ufw enable
    Command may disrupt existing ssh connections. Proceed with operation (y|n)? y
    Firewall is active and enabled on system startup
  • disable firewall

    1
    2
    $ sudo ufw disable
    Firewall stopped and disabled on system startup

磁盘相关

  • 查看系统磁盘占用情况 df -h

  • 查看目录下文件大小 du -sh

  • 查看当前目录下一级子文件和子目录占用的磁盘容量: du -h --max-depth=1

    1
    2
    3
    4
    5
    查看当前目录下user目录的大小,并不想看其他目录以及其子目录:
    du -sh user
    -s表示总结的意思,即只列出一个总结的值
    du -h --max-depth=0 user
    --max-depth=n表示只深入到第n层目录,此处设置为0,即表示不深入到子目录。
  • 总结du常用命令

    du -h –max-depth=1 |grep ‘G’ |sort #查看上G目录并排序

    du -h –max-depth=1 |grep [TG] |sort #查找上G和T的目录并排序
    du -sh –max-depth=1 #查看当前目录下所有一级子目录文件夹大小

  • 清理指定目录下的文件

    例如需要根据时间删除这个目录下的文件,/tmp,清理掉20天之前的无效数据。可以使用下面一条命令去完成:

    1
    2
    3
    4
    5
    6
    7
    8
    find /tmp -mtime +21 -name "*" -exec rm -Rf {} \;
    - /tmp :准备要进行清理的任意目录
    - -mtime:标准语句写法
    - +10:查找10天前的文件,这里用数字代表天数,+30表示查找30天前的文件
    - "*":希望查找的数据类型,".jpg"表示查找扩展名为jpg的所有文件,""表示查找所有文件
    - -exec:固定写法
    - rm -Rf:强制删除文件,包括目录(注意R大写,f小写)
    - {} \; 固定写法,一对大括号+空格+\+;

history

查看历史命令,支持 grep过滤操作

卸载安装的软件

1
2
3
浏览已安装的程序    dpkg --list
卸载程序和所有配置文件 sudo apt-get --purge remove <programname>
只卸载程序 sudo apt-get remove <programname>

安装deb文件出错时

使用apt-get -f -y install修复之后,再进行安装

1
2
3
1.执行命令sudo dpkg -i XXX.deb 返回依赖关系错误提示
2.执行sudo apt-get -f install 这条命令将自动安装需要的依赖包.
3.再次执行命令sudo dpkg -i XXX.deb 安装成功

光标

1
2
3
4
5
6
7
8
9
10
11
Ctrl+a:光标回到命令行首。 (a:ahead)
Ctrl+e:光标回到命令行尾。 (e:end)
Ctrl+b:光标向行首移动一个字符。 (b:backwards)
Ctrl+ f:光标向行尾移动一个字符。 (f:forwards)
Ctrl+w: 删除光标处到行首的字符。
Ctrl+k:删除光标处到行尾的字符。
Ctrl+u:删除整个命令行文本字符。
Ctrl+h:向行首删除一个字符。
Ctrl+d:向行尾删除一个字符。

Ctrl + xx :在命令行尾和光标之间移动

时区

CentOS 7 时区设置

grep

限定查询结果之后的前几行 grep -m 10 <pattern> <file>

限定查询结果倒数的几行 grep <pattern> <file> | tail -10

日期

  • 判断 day of year

    doy=$(date +%j)

  • 制定日期减一天

    date -d"20140101 -1 days" +"%Y%m%d"

  • 当前时间戳(秒)

    1
    date +%s

剪切板

将剪切板中的内容输出到文件 echo $(xsel –clipboard) >> a.txt

将文件的内容复制到剪切板 cat a.txt | xsel –clipboard

securtCRT

1
2
下载服务器文件    sz filename
上传本地文件 rz filename

tr命令

tr – translate or delete characters

  • 大小写转换
    1
    2
    cat file | tr A-Z a-z 
    cat file | tr a-z A-Z

top

  • “1”

    查看所有CPU核的使用情况

  • “c”

    查看具体进程的路径

1
2
3
4
5
6
7
8
9
10
11
12
13
14
15
16
17
18
19
l- 开启或关闭第一部分第一行top信息显示

  t - 开启或关闭第一部分第二行Tasks和第三行 Cpu(s) 信息显示

  m - 开启或关闭第一部分第四行 Mem 和 第五行 Swap 信息显示

  N - 以 PID 的大小的顺序排列表示进程列表

  P - 以 CPU 占用率大小的顺序排列进程列表

  M - 以内存占用率大小的顺序排列进程列表

  h - 显示帮助

  n - 设置在进程列表所显示进程的数量(按完n,再输入个数)

  q - 退出 top

  s - 设置显示信息的刷新频率(由于是命令行模式,显示的过程其实是刷屏的过程)

查看指定服务的运行情况

  • journalctl -u xxx.service

资源占用

1
2
3
4
5
6
7
8
ps -aux | grep 服务名称或pid
# 显示
root 19496 0.0 2.4 4826152 1603360 ? Sl 2020 503:15 java -jar -Xms1024m -Xmx1024m jenkins.war --httpPort=55555

19496 为PID
0.0 为CPU占用百分比(注意:如果有两个CPU,32核64线程,那么总占比是6400%,占用一线程,cpu占比是100%)
2.4 为内存占用百分比

清理缓存

1
sync; echo 1 > /proc/sys/vm/drop_caches

centos安装离线依赖

1
rpm -ivh name.rpm

grep

  • 去除包含特定字符串的行:
1
grep -v "pattern" inputfile > outputfile

参数 -v 是用来反向匹配的选项,它会将不匹配指定模式的行输出

delete

1. To delete all files in a directory except filename, type the command below:

1
rm -v !("filename")

2. To delete all files with the exception of filename1 and filename2:

1
rm -v !("filename1"|"filename2") 

3. The example below shows how to remove all files other than all .zip files interactively:

1
rm -i !(*.zip)

4. Next, you can delete all files in a directory apart from all .zip and .odt files as follows, while displaying what is being done:

1
rm -v !(*.zip|*.odt)

5. 删除指定目录下指定日期的目录,可以使用 findrm 命令来删除指定目录下指定日期的目录

1
find /path/to/directory -type d -mtime +365 -exec rm -rf {} \;

6. 删除指定目录下前一个星期的文件,可以使用 findrm 命令来删除指定目录下指定日期的文件

1
find /path/to/directory -type f -mtime +7 -exec rm {} \;

or

1
find /path/to/directory -type f -mtime +7 -delete
  • 可指定相关名称

    1
    find /var/log -name "*.log" -type f -mtime +30 

AWK

  • awk -v FS="输入分隔符" -v OFS='输出分隔符' '{if($1==$5) print $1,$5,$10}' filename

    查找filename文件(文件中列的分隔符为“输入分隔符”)中,每一行第一列和第五列相等的行,并输出第一列、第五列、第十列,切输出字段分隔符为“输出分隔符”。如果不配置FS和OFS,那么输入输出分隔符均默认为空

  • exclude a column with awk, 比如打印除第5列的其它所有列

    awk ‘{ $5=””; print }’ file

统计文件行数

语法:wc [选项] 文件…

说明:该命令统计给定文件中的字节数、字数、行数。如果没有给出文件名,则从标准输入读取。wc同时也给出所有指定文件的总统计数。字是由空格字符区分开的最大字符串。

该命令各选项含义如下:

  - c 统计字节数。

  - l 统计行数。

  - w 统计字数。

这些选项可以组合使用。

权限

使文件可以直接执行的命令:chmod +x filename

使所有用户对目录都有读写权限:sudo chmod ugo+rw /opt

1
2
3
4
r=4,w=2,x=1
若要rwx属性则4+2+1=7;
若要rw-属性则4+2=6;
若要r-x属性则4+1=7

文件分割

1
2
3
4
5
6
7
split [-a] [-b] [-C] [-l] [要分割的文件名] [分割后的文件名前缀]
–version 显示版本信息
– 或者-l,指定每多少行切割一次,用于文本文件分割
-b 指定切割文件大小,单位 m 或 k
-C 与-b类似,但尽量维持每行完整性
-d 使用数字而不是字母作为后缀名
-a 指定后缀名的长度,默认为2位

将多个分割的文件进行合并

1
cat files_name_1 files_name_2 files_name_3 > files_name
  • 按行数分割

    1
    split -l 10000 bigfile.txt smallfile

    分割之后的文件不影响读取

  • 统计某个文件中的字符数,需要注意的是,如果文件中包含多字节字符(如中文),则每个字符将被视为多个字符来计算。

    1
    wc -c /path/to/file

    在这基础上,统计内容所占KB

    1
    wc -c /path/to/file | awk '{print $1/1024}'
  • awk对文件按照指定多列的内容进行排序

    1
    awk '{print $0}' head_100.csv | sort -t ',' -k2,3 > head_100_sort.csv

    并用sort命令根据指定列的内容进行排序。-t选项表示使用制表符作为字段分隔符,[列数]是你要排序的那一列,“-k1,2”表示先按照第1列排序,若第1列相同则按照第2列排序。

  • 统计字符的长度

    1
    echo 字符 | wc -m

markdown

  • markdown文件转word文件
    1
    pandoc -o output.docx -f markdown -t docx filename.md

find

  • 查找具体文件
1
find / -name 文件名称
  • 查找指定用户的文件
1
find ./* -user 用户名
  • 查找指定用户组的文件
1
find ./* -group 用户组
  • 匹配查找除了某个特定文件类型以外的所有文件,并将结果传递给 rm 命令进行删除

    1
    find . ! -name "*.txt" -delete
  • 匹配多个

    1
    find . ! \( -name "log4j*" -o -name "flink*" \)

ls

ls -lh以可读性G、M查看文件的大小

格式化json

1
echo '{"kind": "Service", "apiVersion": "v1", "status": {"loadBalancer": true}}'|jq .

SED

  • 替换字符

    linux环境:

    1
    sed -i 's/Search_String/Replacement_String/g' Input_File

    mac环境(需要设置备份,以防文件损坏)

    1
    sed -i .bak 's/Search_String/Replacement_String/g' Input_File
  • 删除指定多行

    1
    sed -i '1,5d' example.txt

转换文件编码格式

  • 查看编码

首先我们来看看在 Linux 系统中如何查看文件的编码格式,可以在 vim 中使用如下命令查看:

1
:set fileencoding

输出可能是这样

1
fileencoding=utf-81

也可以使用 fileidentify 命令查看。

  • 转换编码

然后使用 iconv 进行编码格式的转换,比如将一个 utf-8 编码的文件转换成 GBK 编码,命令如下:

1
$ iconv -f UTF-8 -t GBK input.file -o output.file
  • 如果遇到]iconv: 未知xxxx处的非法输入序列,一种解决方法是加入 -c选项:忽略无效字符
    1
    iconv -c  -f gb2312 -t utf8 test.txt -o output.file
1
2
3
iconv -f gb18030 -t UTF-8 input.file -o output.file

gb18030

tar

  • c – Creates a new .tar archive file.

  • x — to untar or extract a tar file

  • v – Verbosely show the .tar file progress.

  • f – File name type of the archive file.

  • z — gzip archive file

  • j — bz2 feature compress and create archive file

  • t — to list the contents of tar archive file

加密

用zip命令对文件加密压缩和解压

1
2
zip -re filename.zip filename 
回车,输入2次密码

批量替换文件名

1
rename -n -e 's/待替换字符串/替换字符串/'  *.png

查找指定目录下的文件内容

1
grep -rn "info" *

查询大文件里面的内容

格式:

1
2
// 使用管道符可以实现过滤既满足时间又满足ip的行。
grep -n -e “10.198.2.133” prometheus.log |grep -e “2019-09-24”|head -n 3

参数解释:
-n 参数的作用是显示查找结果的所在行号
-e 参数表示我们需要搜索的关键字,多个关键字就用多个 -e 参数
prometheus.log 表示待搜索的大日志文件
head -n 3 表示显示前面查询结果的前三条记录

排除指定内容

要仅打印与搜索模式不匹配的行,可以使用grep的-v--invert-match选项。进行反转的匹配。

1
grep -v xxx

wget

  • 下载指定目录
1
wget -r --no-parent http://abc.tamu.edu/projects/tzivi/repository/revisions/2/raw/tzivi/

软连接

  • 创建软连接

    1
    ln  -s  [源文件或目录]  [目标文件或目录]
  • 查找指定目录的软连接文件

    1
    ls -alR | grep ^l

sort

1
sort --parallel=8 -S 4G -T /data -k2,3 largefile.txt > sorted_file.txt

使用了8个线程并行排序,并且sort命令在排序过程中最多使用4GB的内存缓冲区。我们还使用了-T /data选项,指定sort命令使用/data目录来存储临时文件,而不是默认路径。

“-k1,2”表示先按照第1列排序,若第1列相同则按照第2列排序。

编码

  • Base64

    • 解码

      echo [base64-encoded-string] | base64 --decode

    • 编码

      echo "your string" | base64

查看系统配置

  • 查看系统

    • cat /etc/os-release
  • 查看内核

    • cat /proc/version
    • uname -a
  • 查看linux版本

    • lsb_release -a
    • cat /etc/issue
  • 总核数 = 物理CPU个数 X 每颗物理CPU的核数

    总逻辑CPU数 = 物理CPU个数 X 每颗物理CPU的核数 X 超线程数

    • 查看物理CPU个数

      1. top命令,然后输入数字1查看,各项参数如下
        • us:用户空间占用 CPU 的百分比。
        • sy:内核空间占用 CPU 的百分比。
        • ni:调整过优先级的进程占用 CPU 的百分比。
        • id:空闲 CPU 的百分比。
        • wa:等待 I/O 的 CPU 时间的百分比。
        • hi:硬中断(hardware interrupt)占用 CPU 的时间的百分比。
        • si:软中断(software interrupt)占用 CPU 的时间的百分比。
        • st:虚拟机或者运行在它上面的虚拟 CPU 占用 CPU 的时间的百分比。
      2. 输入mpstat查看
      3. 输入以下命令
      1
      cat /proc/cpuinfo| grep "physical id"| sort| uniq| wc -l
    • 查看每个物理CPU中core的个数(即核数)

      1
      cat /proc/cpuinfo| grep "cpu cores"| uniq
    • 查看逻辑CPU的总数

      1
      cat /proc/cpuinfo| grep "processor"| wc -l

top

  • 进程CPU占用率

    top显示某个进程占用cpu达到100%,则表明该进程正在使用所有可用的 CPU 资源。这通常是因为该进程执行的任务非常耗费 CPU 资源,或者该进程存在某些问题导致 CPU 使用率异常高。

    在 Linux 系统中,每个进程都只能在单个 CPU 核心上运行。但是,系统可以通过调度程序(scheduler)在多个 CPU 核心之间轮换运行进程,从而达到让多个进程同时执行的效果。

时区

CentOS 7 时区设置

清理内存

1
sync; echo 1 > /proc/sys/vm/drop_caches

查看buff/cache

forEach() method in Iterable interface

default and static methods in Interfaces

  • Java 8 introduces the “Default Method” or (Defender methods) feature, which allows the developer to add new methods to the interfaces without breaking their existing implementation. It provides the flexibility to allow interface to define implementation which will use as the default in a situation where a concrete class fails to provide an implementation for that method.

Functional Interfaces and Lambda Expressions

Functional Interfaces

Being object oriented is not bad, but it brings a lot of verbosity to the program. Java 8 Functional Interfaces and Lambda Expressions help us in writing smaller and cleaner code by removing a lot of boiler-plate code.

  • An interface with exactly one abstract method is called Functional Interface. @FunctionalInterface annotation is added so that we can mark an interface as functional interface.
  • Some of the useful java 8 functional interfaces are Consumer, Supplier, Function and Predicate.

Lambda Expression

  • Objects are the base of java programming language and we can never have a function without an Object, that’s why Java language provide support for using lambda expressions only with functional interfaces.
  • Lambda Expressions syntax is (argument) -> (body).

Java Stream API for Bulk Data Operations on Collections

Java Time API

Collection API improvements

Concurrency API improvements

Java IO improvements

Miscellaneous Core API improvements

  • format json

    1
    :%!jq .
  • formate xml

    1
    :%!xmllint --format %
  • 显示不可见字符

    1
    :set list
  • 统计字符出现次数

    1
    :%s/字符串//ng
  • 大小写转换

    1
    选择文本之后,执行 g~~ 进行大小写的转换
  • 全文选择

  • 多行操作

    1
    2
    3
    4
    5
    按下 Ctrl + v 进入可视块模式。
    使用上下箭头键或 j 和 k 键选择要编辑的行。
    按下 Shift + i 进入插入模式。
    输入要插入的文本。
    按下 Esc 键退出插入模式,所有选定的行都将被修改。

session

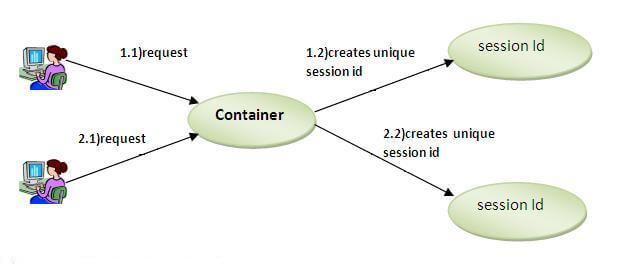
Session simply means a particular interval of time.
Session Tracking is a way to maintain state (data) of an user. It is also known as session management in servlet.

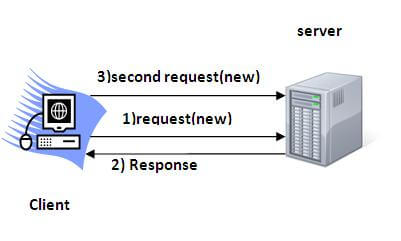
  • HTTP is stateless that means each request is considered as the new request. It is shown in the figure given below:

  • There are four techniques used in Session tracking:

    • Cookies
    • Hidden Form Field
    • URL Rewriting
    • HttpSession

A cookie is a small piece of information that is persisted between the multiple client requests.
A cookie has a name, a single value, and optional attributes such as a comment, path and domain qualifiers, a maximum age, and a version number.

  • Non-persistent cookie

    It is valid for single session only. It is removed each time when user closes the browser.

  • Persistent cookie

    It is valid for multiple session . It is not removed each time when user closes the browser. It is removed only if user logout or signout.

  • Advantage

    • Simplest technique of maintaining the state.
    • Cookies are maintained at client side.
  • Disadvantage

    • It will not work if cookie is disabled from the browser.
    • Only textual information can be set in Cookie object.

HttpSession Interface

  • An object of HttpSession can be used to perform two tasks:
    • bind objects
    • view and manipulate information about a session, such as the session identifier, creation time, and last accessed time.

Web Application

HTML and HTTP

  • HTML:HyperText Markup Language.
  • HTTP:HyperText Transfer Protocol
    • HTTP is the communication protocol between server and client. HTTP runs on top of TCP/IP communication protocol.
    • Port numbers 0 to 1023 are reserved ports for well known services, for example 80 for HTTP, 443 for HTTPS, 21 for FTP etc.
  • Java Servlet and JSPs are server side technologies to extend the capability of web servers by providing support for dynamic response and data persistence.

Web Container

  • When web container gets the request and if it’s for servlet then container creates two Objects HTTPServletRequest and HTTPServletResponse. Then it finds the correct servlet based on the URL and creates a thread for the request. Then it invokes the servlet service() method and based on the HTTP method service() method invokes doGet() or doPost() methods. Servlet methods generate the dynamic page and write it to response. Once servlet thread is complete, container converts the response to HTTP response and send it back to client.
  • Some of the important work done by web container are:
    • Communication Support – Container provides easy way of communication between web server and the servlets and JSPs. Because of container, we don’t need to build a server socket to listen for any request from web server, parse the request and generate response. All these important and complex tasks are done by container and all we need to focus is on our business logic for our applications.
      • Lifecycle and Resource Management – Container takes care of managing the life cycle of servlet. Container takes care of loading the servlets into memory, initializing servlets, invoking servlet methods and destroying them. Container also provides utility like JNDI for resource pooling and management.
      • Multithreading Support – Container creates new thread for every request to the servlet and when it’s processed the thread dies. So servlets are not initialized for each request and saves time and memory.
      • JSP Support – JSPs doesn’t look like normal java classes and web container provides support for JSP. Every JSP in the application is compiled by container and converted to Servlet and then container manages them like other servlets.
      • Miscellaneous Task – Web container manages the resource pool, does memory optimizations, run garbage collector, provides security configurations, support for multiple applications, hot deployment and several other tasks behind the scene that makes our life easier.
  • Java Web Applications are packaged as Web Archive (WAR) and it has a defined structure.

Servlet

  • Servlet API Hierarchy

Session Management

What is a Session?

  • HTTP protocol and Web Servers are stateless, what it means is that for web server every request is a new request to process and they can’t identify if it’s coming from client that has been sending request previously.
  • Session is a conversional state between client and server and it can consists of multiple request and response between client and server. Since HTTP and Web Server both are stateless, the only way to maintain a session is when some unique information about the session (session id) is passed between server and client in every request and response.
  • When we use HttpServletRequest getSession() method and it creates a new request, it creates the new HttpSession object and also add a Cookie to the response object with name JSESSIONID and value as session id. This cookie is used to identify the HttpSession object in further requests from client. If the cookies are disabled at client side and we are using URL rewriting then this method uses the jsessionid value from the request URL to find the corresponding session. JSESSIONID cookie is used for session tracking, so we should not use it for our application purposes to avoid any session related issues.
  • When a JSP resource is used, container automatically creates a session for it, so we can’t check if session is null to make sure if user has come through login page, so we are using session attribute to validate request.
  • As we saw in last section that we can manage a session with HttpSession but if we disable the cookies in browser, it won’t work because server will not receive the JSESSIONID cookie from client.
  • a cookie is a small piece of data stored on the client-side which servers use when communicating with clients.They’re used to identify a client when sending a subsequent request. They can also be used for passing some data from one servlet to another.